
Writing a PoshBot Plugin to Display TOPdesk Tickets and Assets
PowerShell, PoshBot, TOPdesk ·I’ve been using PoshBot daily for a few months now and really enjoy it. I want to be able to view tickets from my regular Teams chat. If I want to talk to someone about a ticket, it would be nice if we could look at the ticket in the same program as our chat, right? Wouldn’t it be nice if you could look at your assets in your chat client?
This post will go through the process of writing and publishing a PoshBot module. For this post I will be using PowerShell Core, welcome to the future!
What is PoshBot
PoshBot is a PowerShell-based chat bot. It can be extended by importing plugins which are just PowerShell modules. The ability to extend the functionality of the chatbot by writing PowerShell is my favorite part. Checkout the project on Github
If you don’t have TOPdesk and are just reading this because you love #PowerShell you should definitely follow take a few minutes to setup a personal slack for your PoshBot. You can get up and running with PoshBot in just a few minutes.
Planning
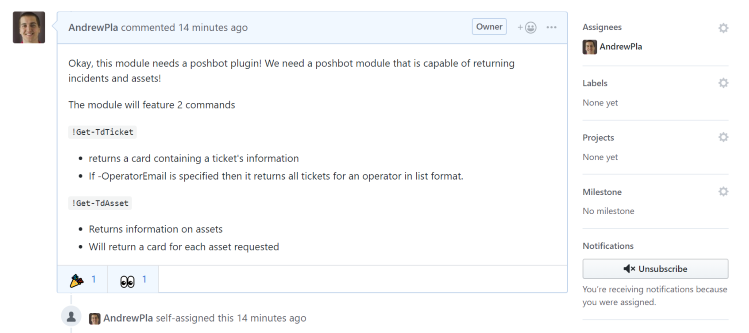
I like tracking my changes with github issues. So let’s create one. We are going to be completing the issue ourselves as part of this post, but filing an issue helps us track things over time. We created the issue on a repo that doesn’t actually contain the plugin, but I feel they are pretty related so let’s roll with it.
You can checkout the PoshBot documentation at link
Setup
There is a little bit of prep work required for us before we can really dig into things.
We need to setup Slack and create a TOPdesk operator account.
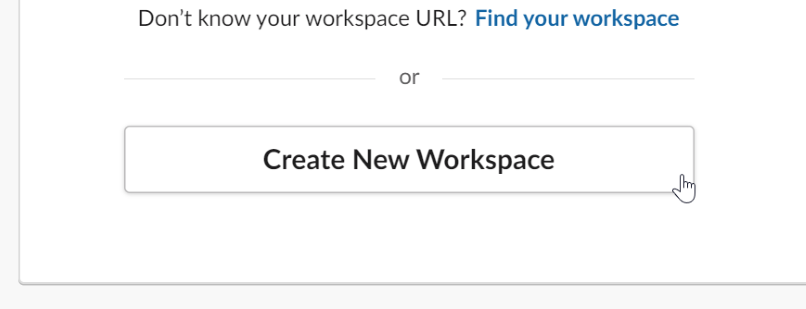
Create New Slack Workspace
Before we can develop a PoshBot plugin it will be helpful to have a test PoshBot Slack instance to work with. I primarily use PoshBot with Teams, but Slack is more accessible. One benefit of PoshBot is that even though we are testing our code with Slack, our module will be available to any backend developed for PoshBot. Not only is PoshBot cross-platform, but it’s also cross-chat-platform!
Add PoshBot to Slack
Setup the bot by using the link at link. Make sure to take note of the api key.
Start PoshBot
To start poshbot we need to generate a configuration and then pass that to Start-PoshBot. Later on we will be loading our poshbot configuration from a file that we create. This method is quick and dirty and will meet our needs for now.
# Install the module from PSGallery if you need it
Install-Module -Name PoshBot -Repository PSGallery

# Import the module
Import-Module -Name PoshBot

# Create a bot configuration
$botParams = @{
    Name = 'poshbot' # Change this to whatever you want
    BotAdmins = @('<SLACK-CHAT-HANDLE>') # Grab this from your slack account settings
    CommandPrefix = '!'
    LogLevel = 'Info'
    BackendConfiguration = @{
        Name = 'SlackBackend'
        Token = '<SLACK-API-TOKEN>'
    }
    AlternateCommandPrefixes = 'bender', 'hal'
}

$myBotConfig = New-PoshBotConfiguration @botParams

# Start a new instance of PoshBot interactively or in a job.
Start-PoshBot -Configuration $myBotConfig #-AsJob
Now we have PoshBot running. Let’s send a DM to our bot with a test command to verify.
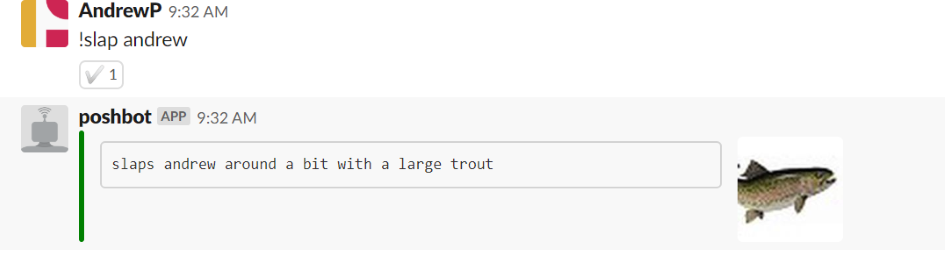
Ouch, looks like it’s working.
Create TOPdesk Operator Account
You should begin my creating a dedicated operator account in TOPdesk with the appropriate permissions, operator groups, category filters, etc. This account will also need API access and you must login and generate an application password. If you want to use the !Get-TdAsset command then you will need to ensure that the operator has access to asset management.
I created an operator named poshbot.
> Get-TdOperator poshbot | Select loginname

loginName
---------
POSHBOT
Generate TOPdesk Application Password
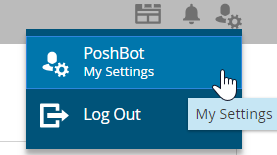
We need to generate an application password from the TOPdesk operator account that we created. Login to TOPdesk with that account, then select My Settings in the top right.
Scroll to the bottom of your settings and you can select “Add” to create a new application password. Store this into a password manager of your choice and we are good to go.
Writing the Module
This is a simple module so we will just use a psm1 and a psd1 file. We will need to create a dependency on the Poshbot and TOPdeskPS modules. We require the PoshBot Module because we are going to be using the New-PoshBotCardResponse command. We need the TOPdeskPS module because we will be using it to connect to and retrieve incidents from TOPdesk for us. We will be using the Get-TdAsset, Get-TdIncident, and Connect-TdService
Create .psd1 + .psm1 file
I’m borrowing this code from the PoshBot Docs. I normally use plaster to template my projects, but I’m trying to keep things nice and simple with this one.
$params = @{
    Path = '.\PoshBot.TOPdesk.psd1'
    RootModule = '.\PoshBot.TOPdesk.psm1'
    ModuleVersion = '0.1.0'
    Guid = New-Guid
    Author = 'AndrewPla'
    Description = 'Display TOPdesk Incidents and Assets into TOPdesk'
    Tags = 'PoshBot'
    RequiredModules = @('TOPdeskPS','Poshbot')
}
New-ModuleManifest @params
New-Item PoshBot.TOPdesk.psm1
Now that we have our files setup, we can proceed to get into the fun stuff, coding!
Setup PoshBot Configuration
In order to authenticate with TOPdesk we will need to use the credential of the TOPdesk operator that we created earlier
- We will need to store a credential using poshbots builtin methods
- I will need to use ` [PoshBot.FromConfig(‘Credential’)]
to retrieve the[pscredential]` - I need to write a how to with the module for handling setting the apikey and TOPdeskUrl
Storing Credentials/Url with PoshBot
We need to create a new bot config file that contains our encrypted credentials.
To copy from the PoshBot Docs regarding using credentials
It is possible to store values of type PSCredential and SecureString inside the bot configuration. Internally, PoshBot serializes these values encrypted to disk. Only the user who exported the configuration to disk, can import it.
First, let’s run the below code so we can have the $pbc configuration object available to us. We ran this code earlier.
$botParms = @{
    Name = 'name'
    BotAdmins = @('<SLACK-CHAT-HANDLE>') # Grab this from your slack account settings
    CommandPrefix = '!'
    LogLevel = 'Info'
    BackendConfiguration = @{
        Name = 'SlackBackend'
        Token = '<SLACK-API-TOKEN>'
    }
    AlternateCommandPrefixes = 'bender', 'hal'
}

$myBotConfig = New-PoshBotConfiguration @botParams


$pbc = New-PoshBotConfiguration
Plugin Configuration
After running the above code, we are left with a configuration in the $pbc variable. Now we get our chance to setup our credentials. We will be prompted for our TOPdesk creds. Provide the TOPdesk login ame of the operator that you created earlier and the password will be the application key. The Url needs to be the Url to your TOPdesk instance. If you use a different port, you can specify it using https://companyurl:1234
Creating this config file is a one-off type thing. Once you create the config file and setup poshbot to load poshbot from that config you will be golden.
$myCred = Get-Credential # TOPdesk operator creds
$pbc.PluginConfiguration = @{
      'PoshBot.TOPdesk' = @{
        Credential = $myCred
        Url = 'https://company.topdesk.net'
        ApplicationPassword = $true # I recommend using an application password
    }
}

# Save the configuration so we can reuse.
$pbc | Save-PoshBotConfiguration -Path ~/.poshbot/bot.psd1
Now we can start poshbot again, only this time we need to grab the config file that we just created at ~/.poshbot/bot.psd1
Going forward, we can start the bot using the below code. If you are using this on a production environment I would use an operator with the minimum required permissions and properly protect your .psd1 file.
# Start the bot using our newly stored creds
$myBotConfig = Get-PoshBotConfiguration -Path ~/.poshbot/bot.psd1
$myBotConfig | Start-PoshBot
Write Get-TdIncident
This command is going to return incidents. We need to have parameters to accept the plugin configuration that sets up our credentials/url.
To accept parameter input from the plugin configuration that we set in the last step we need to add [PoshBot.FromConfig('ConfigName')] to each Parameter.
We need 3 parameters that accept input from the config system: 'TOPdeskCredential', 'TOPdeskUrl’, and 'ApplicationPassword'
This is what the function looks like when completed
function Get-TdIncident {
    <#
    .SYNOPSIS
        Returns Incidents. If you specify an operatoremail you can see all incidents assigned to them
    .PARAMETER TicketNumber
        The Number of the ticket that you want returned.
    .PARAMETER NumberofActions
        The number of actions that you want returned. by default no actions are returned.
    .PARAMETER OperatorEmail
        Specify the email of an operator who you want to see all assigned incidents. Only returns uncompleted incidents.

    .Example
    !Ticket I1902-123
    Returns a card for incident I1902-123
    .EXAMPLE
    !Ticket -op username@company.com
    Return list of all open tickets for the operator with the specified email
    .EXAMPLE
    !Ticket i1902-123 -actions 3
    Returns a card for i1902-123 and will also return the most recent 3 actions on the card
    #>
    [PoshBot.BotCommand(
        Aliases = ('ticket', 'Incident')
    )]
    [cmdletbinding()]
    param(

        [parameter(position = 0)]
        [Alias('tn', 'ticket', 't')]
        [string]$TicketNumber,

        [Parameter(position = 1)]
        [Alias('actions', 'actioncount', 'a')]
        [int]
        $NumberOfActions = 0,


        [Parameter(position = 2, ParameterSetName = ('OperatorEmail'))]
        [Alias('op', 'o', 'operator')]
        [string]
        $OperatorEmail,

        [PoshBot.FromConfig('Credential')]
        [parameter(Mandatory)]
        [pscredential]
        $TOPdeskCredential,

        [PoshBot.FromConfig('Url')]
        [Parameter(Mandatory)]
        [string]
        $TOPdeskUrl,

        [Parameter(Mandatory)]
        [PoshBot.FromConfig('ApplicationPassword')]
        [Switch]
        $ApplicationPassword
    )
    Import-Module TOPdeskps -MinimumVersion 0.1.0

    Connect-TdService -Credential $TOPdeskCredential -Url $TOPdeskUrl -ApplicationPassword:$ApplicationPassword -usertype 'Operator'

    if ($OperatorEmail) {
        $operator = Get-TdOperator -TOPdeskLoginName $OperatorEmail
        if ($Operator) {

            # Grab uncompleted tickets
            $Incidents = Get-TdIncident -OperatorId $Operator.id -Completed:$false -ResultSize 100


            $incidentText = ($incidents |
                select-object Number, BriefDescription, @{name = 'Processing Status'; e = {$_.processingstatus.name}} |
                Format-Table * |
                out-string).trim()

            $TicketListResponse = @{
                Color = "#057AAB"
                Title = "$($operatorEmail)'s Tickets"
                Text  = $incidentText
            }
            New-PoshBotCardResponse @TicketListResponse

        }
        else {
            $operatorNotFound = @{
                Title = "Error: No Operator found"
                Text  = "There was no Operator found with email address $OperatorEmail"
                Type  = 'Error'
            }
            New-PoshBotCardResponse @operatorNotFound

        }
    }
    Else {
        $Ticket = Get-TdIncident -Number $TicketNumber
        if (-not $Ticket) {
            $errorCard = @{
                Title = "Error: No Tickets Found"
                Text  = "There were no incidents found with number $TicketNumber"
                Type  = 'Error'
            }
            New-PoshBotCardResponse @errorCard
            Return
        }


        #region Ticket Info
        # Hashtable containing values
        $TicketInfoObj = [pscustomobject]@{
            ProcessingStatus = $ticket.processingStatus.name
            Number           = $ticket.number
            Request          = $ticket.request
            BriefDescription = $ticket.briefDescription
            Caller           = "$($Ticket.caller.dynamicname) | $($ticket.callerbranch.name) "
            Category         = "$($ticket.category.name) | $($ticket.subcategory.name)"
            TimeSpent        = $ticket.timespent
            Operator         = "$($ticket.operatorGroup.name) | $($ticket.operator.name)"
        }

        $TicketCardResponseParams = @{
            Color = "#057AAB"
            Title = "Ticket: $($TicketNumber.tostring().ToUpper()) - $($TicketInfoObj.briefDescription)"
            Text  = ( $TicketInfoObj | Format-List * | out-string).trim()
        }

        New-PoshBotCardResponse @TicketCardResponseParams

        #endregion Ticket Info

        #TODO Construct an actions card

        $actions = $ticket | Get-TDIncidentAction

        # Blank hashtable to collect all of our actions


        # Only return the number of actions specified in $NumberofActions
        foreach ($action in ($actions | Select-Object -first $NumberOfActions) ) {
            if ($action.invisibleForCaller -like 'True') {
                $title = 'Invisible Action'
                $color = '#888888'
            }
            else {
                $title = 'Action'
                $color = '#057AAB'
            }


            $memoText = $action.memotext

            # We need to trim how long the response is sometimes I think
            if ($memotext.length -gt 750) {
                $memoText = $Memotext.Substring(0, 250)
            }


            $act = @{
                Title     = $title
                memoText  = $action.memoText
                entryDate = $action.entryDate
                operator  = $action.operator.name
                person    = $action.person
            }

            $actioncard = @{
                color = $color
                Title = $Title
                Text  = ([pscustomobject]$act |  Format-List * | out-string).trim()
            }

            # Now lets output our actions if we are supposed to.
            New-PoshBotCardResponse @actioncard
        }

    }

}
Write Get-TdAsset
Now that I’ve done this once already, creating this second command should mostly be copy/pasta with a few tweaks along the way.
This is what the finished function looks like
function Get-TdAsset {
    <#
    .SYNOPSIS
    Returns TOPdesk Assets.
    .PARAMETER NameFragment
    Part of the name of the an asset you want returned. No wildcards are required as this is just looking for the provided fragment.
    .EXAMPLE
    !Asset '10'
    Returns all assets with 10 in the name
    .EXAMPLE
    !Asset Printer
    Returns all assets with printer in the name
    #>
    [PoshBot.BotCommand(
        Aliases = ('tdasset', 'tda')
    )]
    [cmdletbinding()]
    param(
        [Parameter(position = 0)]
        [Alias('Name', 'n')]
        [string]
        $NameFragment,

        [PoshBot.FromConfig('Credential')]
        [parameter(Mandatory)]
        [pscredential]
        $TOPdeskCredential,

        [PoshBot.FromConfig('Url')]
        [Parameter(Mandatory)]
        [string]
        $TOPdeskUrl,

        [Parameter(Mandatory)]
        [PoshBot.FromConfig('ApplicationPassword')]
        [Switch]
        $ApplicationPassword
    )

    # have to specify version for some reason
    Import-Module TOPdeskPS -MinimumVersion 0.1.0

    Connect-TdService -Credential $TOPdeskCredential -Url $TOPdeskUrl -ApplicationPassword:$ApplicationPassword -usertype 'Operator'


    $Assets = Get-TdAsset -NameFragment $NameFragment

    foreach ($asset in $assets) {
        $assetDetail = $asset | Get-TdAssetDetail

        $actioncardParams = @{
            color = '#464775'
            Title = "$($asset.text) | $($Assetdetail.metadata.templatename) "
            Text  = ($assetDetail.data |  Format-List * | out-string).trim()
        }

        New-PoshBotCardResponse @actionCardParams
    }
}
Bask in Glory (Temporarily)
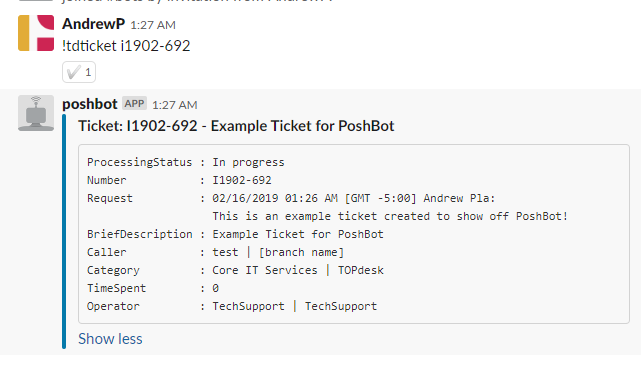
So things are good so far. Let’s take a look at what gets output.
Returning Incidents
Return an Asset

Publish Module to Github
Creating a projecto on Github is a great way to give this module a home. It gives a place for other people to improve it and also to ask questions.
I created a new project called PoshBot.TOPdesk. One of my first tasks needs to be updating the Readme so it instructs people how to get setup with this module. I also need to update the .psd1 file so it includes a ProjectUri and a LicenseUri.
Publish Module to PowerShell Gallery
I don’t plan on doing any CI/CD setup for this module, unfortunately. So, I will just be publishing it using the command line.
Publish-Module -name poshbot.topdesk -nugetapikey $apikey -repository psgallery
Final Thoughts
That was a lot of fun. Hopefully someone else gets some use out of the module. If you still haven’t setup PoshBot for yourself you have my blessing to do so now.
Checkout the PoshBot.TOPdesk module here: https://github.com/AndrewPla/PoshBot.TOPdesk
Checkout the TOPdeskPS Module here https://github.com/AndrewPla/TOPdeskPS
If you want to make the module better, please contribute. If you have suggestions or just want to chat, you can reach me on twitter at @AndrewPlaTech